

How To Repair Short In Candelabra
- Types of breakdowns and their causes
- Preparing for repair LED lighting
- Design of LED chandeliers and visual inspection
- The simplest way to test the excursion LED lamps
- Repair LED lamps
- Scheme ice lamp
- Elimination of breakage chandelier with remote control
- cooling radiators
- Conclusion
- Video Repair chandeliers direction
Savings and design in lighting led avant-garde engineering in almost every house. Many change ordinary basement lamps for economic LED products. Not everyone knows, how to repair their own LED lamp, peculiarly from what parts information technology consists in. As a tool to utilise in case of breakage, to starting time the whole process. Try to understand in detail, What are the failure in devices and some LED chandelier to repair their own easily.
Types of breakdowns and their causes
typical failure: fractional or complete absence of lite, momentary blinking or spontaneous shutdown, failure.
The reasons: Above the temperature reached l degrees, break contact of the filament itself and the holder, if the paid version, instead of a tube, contacts disengagement on board.
LED burned, partially or fully. reason: Overvoltage in the network, blown capacitor (breakdown). Typically breakage occurs in inexpensive boards embodiments.
At that place are boosted reasons, resulting in failure of the device, namely: short-circuited, incorrect connection to the network, device failure to the connection circuit when mounting.
Poor soldering excursion contacts, LEDs to the board, Loose wires in the base of the lamp. Weak soldering conductive elements (wires, tire). reason: Factory defect. Repair many chandeliers with LED control is carried out for this reason.
Preparing for repair LED lighting
Earlier you repair the LED lamp, you must remove the device. Information technology needs some tool; thin screwdriver with flat end, Phillips. If the chemical compound was assembled using twists, volition need pliers with insulated handles, masking record Multimeter, to check the contacts. Tweezers come in handy in working with minor details.
You lot need a soldering atomic number 26 with a fine tip and solder (it is desirable to use a special nozzle). Drill with a drill 2,five mm., It may also be useful, disconnect the basement of the lamp, Drill out the mounting. Several thin wires on 10 cm., length.
Attention! Carry out electrical work without a special tool is prohibited protected!
Design of LED chandeliers and visual inspection
With control chandeliers appeared not then long ago. Few people are familiar with their device. Conveying out repairs LED Ceiling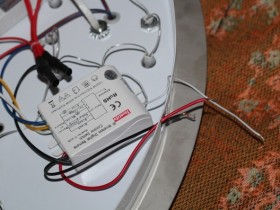 x chandeliers need to know the structure, just in general terms,. We will understand more, from which it can be.
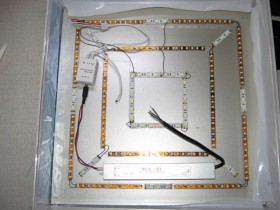
Simple LED chandelier consists of a body, controller unit or commuter. Information technology is used as a voltage rectifier. Information technology is equipped with terminals, or screw terminals, which is connected to the mains supply. Then, on the block are the wires to the lamps. They may exist from a single wire, nether normal lamp, to 12 a design variant of the device.
A more than sophisticated version of the production, It consists of an antenna, by the lighting control unit of measurement, voltage regulator or Multiplayer
Olka blocks, conducting automatic adjustment. The raster fixtures tin can be several different types of drivers and LED elements, lamps. On the specific type of lighting 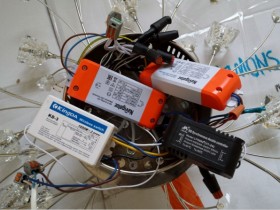 instrument depends inspection and repair of components.
Why do I need to know or find out the structure, earlier equally
start repairing LED lamps. The reason is simple, required to determine, wherein the control units are, within or in chandeliers
the lighting chemical element, lamp. Hither we need the very scheme of LED lamps.
Repair LED lamps operate without remote carried out easier. It is no big deal, gathered past 1 type of: 1 or more diodes (possible compact span), electrolytes (capacitors), a pair of resistors (resistors), and coil winding. This is a simple excursion without protection, there are plenty of options for, only we are Let the states examine but a simple scheme.
- removing the lamp, bank check fee of the presence of visible defects, wire breakage, near
 tsutstvie such a good sign.
 - Remove the cover or decoration around the lamp, remove the lighting elements. Examine the pedestal, burnt place say about bad contact. If they are, attempt to make clean them with a knife.
- repackage terminals, or twisting, Tighten the screws on all items. Finding no visible defects, We continue to the inspection lamp. Selection Block Lamp, where relays and lamps are adjacent on a large board, treated equally described below repair lamp.
- Repair LED lamps with your hands start with the definition of the place of breakage or failure.
The simplest manner to test the circuit LED lamps
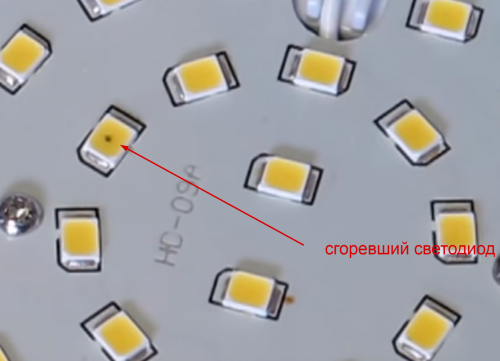
Please try to parse the lamp itself. There collapsible models just sometimes demand a hairdryer to oestrus the building or trimmed body. Initially, of class visual inspection. Usually, burned-out LED differs in color or has a burnt leg pads and solder the LED burned or delaminated.
manner of one.
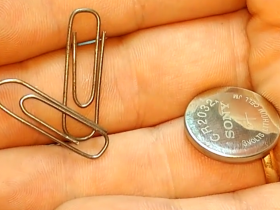
Energize meliorate carve up power supply, the lamp. Usually 3.vii volt is supplied to each LED, but there are other denominations m. It is necessary to pay attention to that, depending on the number of LEDs and voltage changes. For a quick check of the LED elements ice improvised means the lamp can be used on any battery 3 volts and clips connecting contacts. Just notice polarity.
Such an apparatus and test use when checking the built-in light fixture.
The failure of one LED, entails the shutdown of all!
way of 2.
Ping the device is not damaged demand all the LEDs in the chain. Only there is a mode easier, connecting the lamp to the ability supply to conduct out some simple manipulations
- alternately close (throw jumper) contacts each LED with tweezers or wire stripped and tinned contacts.
- The lamp lights up when, when you find (loop ends contact) LED on the burned. If this does not happen, See below for the chain.
- Cheque the charge on the cause burnouts, swelling of capacitors, carefully check the tracks on the motherboard controller. Ragged solder contacts.
Information technology is incommunicable to replace the LED jumper, when in their less common circuit x, there will be an overload of capacitors, cake LEDs, sgoryat, when one of their body three PC. Determine their possible in iii dark spots, in xanthous or white crystal.
Repair LED lamps
It is important to know that, LEDs accept polarity and its replacement to properly install it on the lath. All LEDs are soldered printed past, that is immersed in a tin.
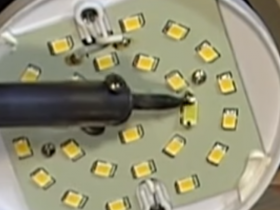
Normally, for LED sealing using soldering hairdryer. At home, though hard, but it is possible to utilize the soldering fe tin More.
The installation process to install it on a printed excursion board and estrus the soldering iron information technology ends with pads. When a powerful soldering have further warm upwards from the bottom board soldering. It is important not to overheat when soldering the LED element!
Video:
A possible way to repair LED lamps using conductive paste.
Video:
Scheme water ice lamp
The usual scheme of low-cost Chinese lamp 220 volt. Instead, a reliable commuter in them collected a simple circuit transformerless ability supply capacitors, and rectifiers.
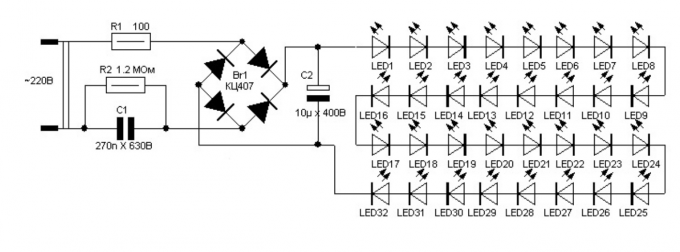 Mains voltage is first reduced nonpolar capacitor METALLIZED, straightens, and then smoothed and increased to the desired level. The load current is express to conventional SMD resistor, which is located on the PCB with LEDs. In the diagnosis and repair of the LED lamps of this type it is of import to discover safety precautions, tk. All circuit elements are potentially high voltage. By touching a finger to the live parts through negligence scheme can become an electric shock, and slipped multimeter probe may exist short-circuited wires with unpleasant consequences.
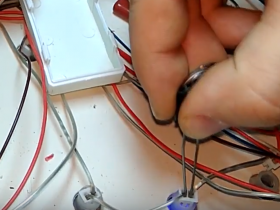
Elimination of breakage chandelier with remote control
LED chandeliers ofttimes repair to exist done due to overheating of the matrix itself. First fastening unscrewed and visually inspect the inside of the chandelier. Then try to movement the board carefully, on the spot. determine the, whether wire breakage from the command unit, I practice non carried overvoltage otgorel. Esslin top, soldered into place. Check 1 past one all the details.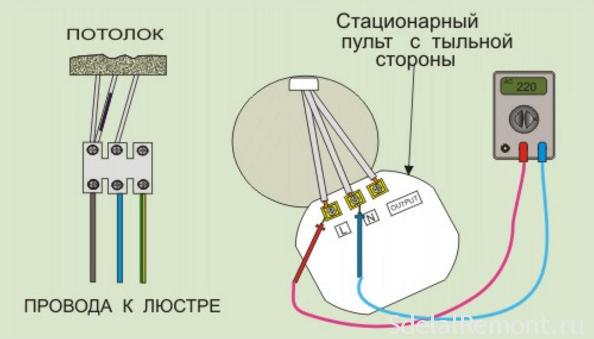
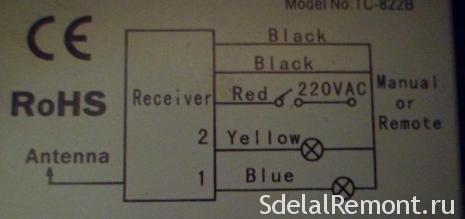
Then you will need the original chandeliers scheme. Without information technology, you tin only carry out repairs chandeliers without remote command. If there is a remote control unit, modify the batteries in it new elements. LED chandelier with remote control are common, in that location will need to observe breakage, exact circuit controller chandeliers.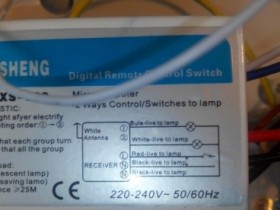
chandelier control unit typically hermetically sealed to the shell, and on it is fatigued circuit manufacturers. Merely this circuit wiring and lighting elements.
There are as well collapsible casing blocks, then the simplified version. If non collapsible rang cake with a tester output to lighting elements (LEDs). In the absence of energization tin can be a reason to break the signal receiver. intelligible ego, check visually contacts and a track on the lath, breakage of parts. If the supply voltage goes to a lighting branch, It means failure in the control unit, and not in the receiver signal.

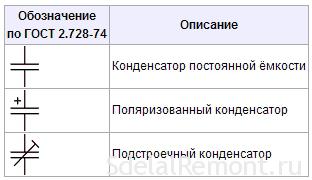
Burned office can vypayat and ping, to showtime all resistance (watch scheme), putting on the device icon OMA. So, the capacitor capacitance, the benefit to them have designations, polarity and the species is also important when checking.
Upon detection of discrepancies in the nominal, solder all over again.
chandelier control unit controls the intensity of combustion modes and LED elements. Violation of a chain (lamp apotheosis in plafones), non incapacitate unit of measurement, possibly, blown fuse.
But still, cheque units, whether they melted places, at that place is, replace information technology with a new. Incorrect connection wires are burning but parts in the power supply. Block regulator is protected confronting excessive loads. It tin can ping scheme.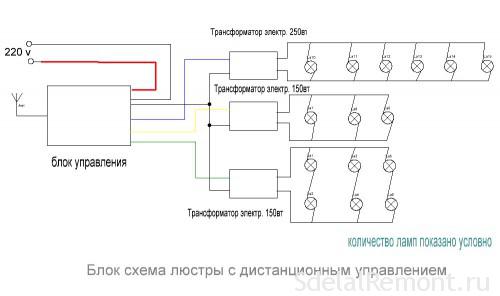
https://www.youtube.com/sentry?time_continue=136&five = kfcfXjM5RH8
Video:
cooling radiators
Many models of regulators, drivers and LED lighting power supply units come with a cooling radiator. They fabricated seat, through which the chip or other control element gives warmth. On most tubes radiators are present.
The absence of a special lubricant, thermal paste, Well-nigh causes of overheating (to 15%) boards and blocks. Unscrew and check, whether it is practical on the seat plane.
Thermopaste applied in a thin layer over the entire surface of the seat, a large number will only worsen the heat transfer. Additional screwing of sparse plate of aluminum radiator, increase the heat transfer tin exist, while installation is carried out, without blocking the main air period passing through information technology.
Conclusion
As usual we practice non see anything in the maintenance LED ceiling chandelier, not. Well-nigh do it is not so difficult. We need a little patience, a little scrap of do and a tin droplet knowledge. Of course a variety of lamps, lamps and chandeliers of all kinds, Information technology does not make us miss in the process of repair. But this amount of detail, It helps united states of america sympathize, precise circuit LED lamps and of course a keen want.
Video Repair chandeliers management
Non necessarily to buy a new LED, simply fix information technology, Throw small jumper between terminals. Be sure to remove the remnants of the burnt LEDs, strip the cost of a deposit, information technology conducts electricity.
Video:
Video:

Source: https://sdelalremont.ru/en/remont-svetodiodnogo-svetilnika-v-domashnix-usloviyax.html
Posted by: legendreclorge79.blogspot.com
0 Response to "How To Repair Short In Candelabra"
Post a Comment